You probably already know Let’s Encrypt. It’s the new kid in town. It offers something that web site’s owners and administrators have been asking for a long time: free SSL certificates. Until now, if you wanted to secure a web site you had to go to the market and buy an SSL certificate from one of the multiple providers, Godaddy, Digicert, Thawte, you-name-it and, of course, you had to pay for it. Now you can have your certificate for free, and it’s really easy to secure your web site using Let’s Encrypt and Apache.
The idea promoted behind such an offer is that, as they say on its blog, encrypting is something all of us should be doing to protect the information transmitted on the internet. Join this idea to the fact that Google will take into account the encrypted connection in the search ranking algorithm -in other words, sites using HTTPS will rank better than sites using HTTP- and you have the perfect excuse to have a look.
Encrypting is something all of us should be doing to protect the information transmitted on internet Click To Tweet
So I went down to the Getting Started documentation – quite good and really to the point – just to play a bit with Let’s Encrypt certificates.
If you have ever deal with one of the providers mentioned above, and you have followed the process to prove that you are who you say that you are, and pay, download and install the certificate, you must agree that the brand new client-based way to generate – and in some cases install – the certificates is a step forward.
Generate the certificate files
In my particular case, I have to generate a certificate on a Ubuntu 14.04 host, and I have to install the certificate on a SLES server. I decided to install the client from Github. So the first step is straightforward.
Login the Ubuntu host and execute:
$ git clone https://github.com/certbot/certbot $ cd certbot $ ./certbot-auto --helpThe command to generate the certificate for a web site, e.g. demo.com:
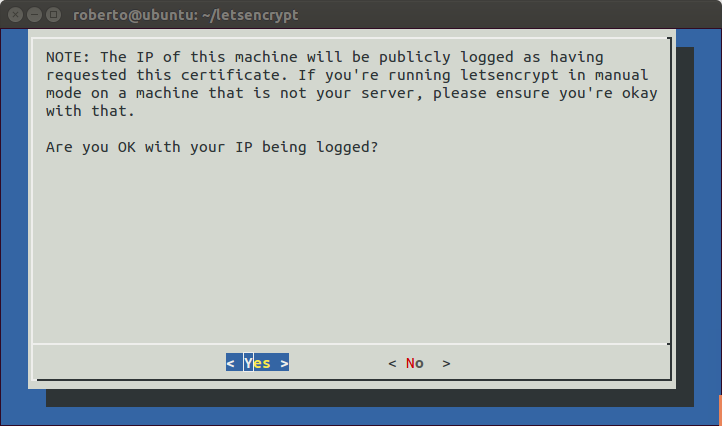
$ certbot-auto certonly --manual -d demo.comWhen you execute this command the script will open a dialog window. If you agree with your IP being logged just keep going.
capture 1. Let’s Encrypt first dialog window.
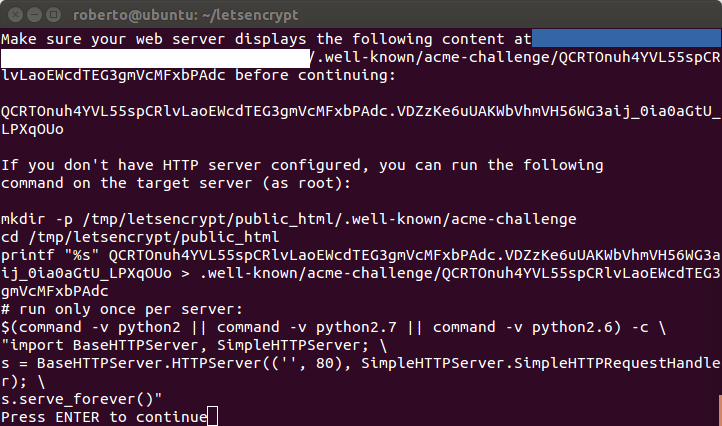
The next dialog message will ask you to probe that you are the owner of – or at least you have access to – the domain you try to generate the certificate for. Basically you have to install a file on a particular folder on the server, or execute a command that is shown on the dialog text. In both cases Let’s Encrypt servers will try to access the files. If everything is fine you will have your files under the folder /etc/letsencrypt/file/<domain>/
Remember that the certificates will expire after 90 days!! It must be renewed by running this process again.
capture 2. Prove you are the owner.
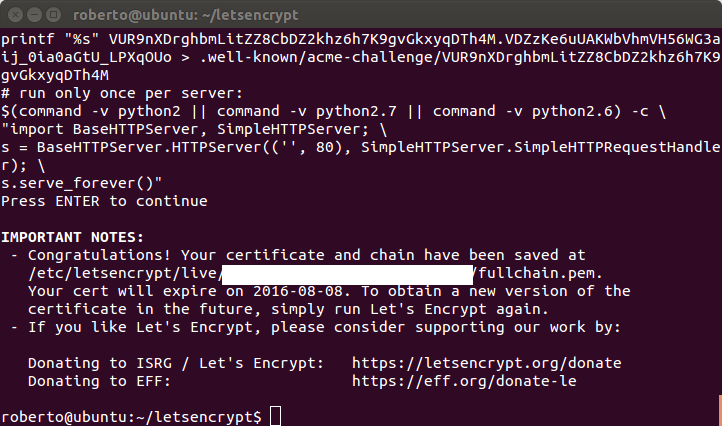
Once verified the script creates the files.
capture 3. The files are created.
The files that you will find are:
- cert.pem. This file contains the certificate.
- chain.pem. This file contains a cross signature from an idenTrust root which is present in most browsers today.
- fullchain.pem. This file contains the chain.pem + cert.pem. It is used by Nginx or Apache 2.4
- privkey.pem. As you might guest, this file contains the private key
Install the certificate files
The steps to install the certificate on your Apache web server is quite simple. Let’s say your web site is www.demo.com. On the host, create the folders to store the files:
$ mkdir -p /etc/apache2/ssl.crt/www.demo.com $ chmod 644 /etc/apache2/ssl.crt/www.demo.com $ mkdir /etc/apache2/ssl.key/www.demo.com $ chmod 644 /etc/apache2/ssl.key/www.demo.comNow it is time to copy the files to the host using your preferred command. In my case, I have used a different computer to generate the certificates, so I use the scp command to copy the files to the right place.
$ scp cert.pem root@server:/etc/apache2/ssl.crt/www.demo.com $ scp chain.pem root@server:/etc/apache2/ssl.crt/www.demo.com $ scp privkey.pem root@server:/etc/apache2/ssl.key/www.demo.comConfigure your web site to use Let’s Encrypt
To secure your web site you have to configure Apache to take into account your previous work. Would you like to create a virtual host for your web site? Please do it!. Go the folder and copy the template.
$ cd /etc/apache2/vhost.d $ cp vhost-ssl.template www.demo.com-ssl.confNow fire up your preferred text editor and edit the file www.demo.com-ssl.conf. You would need to set the value of some SSL related variables to the files that you have just copied. Look for the variables SSLCertificateFile, SSLCertificateKeyFile and SSLCertificateChainFile.
SSLCertificateFile /etc/apache2/ssl.crt/www.demo.com/cert.pem SSLCertificateKeyFile /etc/apache2/ssl.key/www.demo.com/privkey.pem SSLCertificateChainFile /etc/apache2/ssl.crt/www.demo.com/chain.pemApache shall now listen to the port 443 for encrypted communications, instead of the standard port 80. Modify the file /etc/apache2/listen.conf to allow port 443:
Listen 443In case you have multiple virtual hosts, add a line:
NameVirtualHost *443Do not forget to open the port on your firewall; either open the port 443 or just include the service HTTPS on the allowed services.
Now you should restart apache
/etc/init.d/apache2 restartYour web site should be up and running using the HTTPS protocol. Start your browser and check it on https://www.demo.com/
Troubleshooting guidelines
Do you have problems on your VirtualHost configuration? Please try something like this.
Directory "/srv/www/vhosts/www.demo.com" Options -Indexes FollowSymLinks MultiViews AllowOverride None Order allow,deny Allow from all /DirectoryIf you have a warning symbol on the browser indicating some malfunctioning on the certificates it could be the case that your site is serving some files using HTTP and some files using HTTPS. In this case fire up Chrome and open More tools -> Developers tools. The right column indicates the lines that you have to update to have the full site being served using HTTPS.